Fitting a Different engine than norm to an Aeroplane is not easy, but is a lot easier to do, when somebody has done it before, and this is why I have put this info together from my own experience and info gathered from other people.
This should help anybody thinking of converting thier Xair or other aeroplane to the BMW R100 engine.
The problems you have to overcome when fitting a non standard engine is:-
* Sourcing a suitable engine
* Converting it to aero use
* Finding a way of driving the propellor - reduction gear
* Making/sourcing of custom parts to suit Aeroplane e.g. Exhaust system
* Making a new or changing the existing engine mount to fit.
* Calculating the CG changes and load testing the new engine mount installation.

The BMW R100 series engine, is a 1000cc horizontally opposed two-cylinder air-cooled 4-stroke engine, commonly known as the "Boxer". This engine has been used in the BMW motor cycles since 1970's and has proved it's reliability.
The prefered model for conversion was produced between 1981 & 1984 (UK) And is rated by BMW as 70hp @ 7000rpm with it's maximum torque 56Lbft @ 6000rpm. The latter models '84 to '94 are also suitable but were de-tuned, and will require extra work to upgrade.
The R100 along with the larger R1100 is currently used in a variety of Ultralights & Homebuilts in Europe with great success.
It has major advantages over the most commonly used 2 strokes namely:
Reliability(can be converted for around Ł2000 stg)
Noise
Fuel consumption
Cost
How do I go about Converting the Engine ?
The layout of the engine is ideal for our use, and by twin plugging and "Gas Flowing" the heads, (which can be done fairly easily, by your bike shop or local Engineering firm), we can add an extra 8 to 10 hp.
First of all you need to obtain the engine. The condition of one, when you buy it, will greatly depend on:- Your Budget, and how much work you are prepared to do, or are able to do, on re-building it.
What I recommend, and this is the easiest approach, is to go to your local BMW bike shop, and purchase from them, the following:-
* R100 Engine '81 - '84, (without the gearbox & Clutch) post '84 engines as said above will also be ok. Have them strip it & look it over, (All the post '81 engines will all have Nikasil Barrels, and these are good for 200,000 miles, so it shouldn't need much work).
* Get him to fit new valves & Guides, get harden valve seats if you want it to run on unleaded. ('86 to '94 are already unleaded)
* Tell him you also want the heads twin plugged. (You could also have the heads "Gas Flowed" if possible).
* Get the standard 40mm Bing C/V Carbs,
* The Valeo Starter, (lighter than the Bosch, and smaller capacity battery will turn it).
* Pre '81 flywheel,
* You will then need two of the 'K' Series, twin output coils, (these are better and lighter than the 'R' series), and two of the R100 Ignition Control Unit's (for the dual Ignition)
I would suggest getting the BMW dealer to do as much as possible for you, as will save loads of time in the long run.
My Engine
The engine I got for my Xair was a 1983 R100RS with 43,000 miles, the engine was run before it was taken out of the bike, and my BMW dealer said "you would only be wasting gaskets to strip it", he suggested fitting a new timing chain which was due at 40,000 and said to leave it at that!
So you can really go as little or as far as you want in terms of how much time and money you spend on your engine conversion.
But what we don't want to get away from, is the reason's we are fitting this engine, it's reliability, simple conversion and cost, you can literally take the engine out of the bike and bolt on your adapter plate and gearbox and start it up!! After that it is down to improving things and tailoring to fit the Aeroplane.
Along with the new timing chain kit, I also purchased two carb rebuild kits (new gaskets, diaphrams, float needles and 180 main jets), new plugs (4) and oil filter, A sump gasket as I wanted to give the sump pan a clean, New plug leads (4) and a extra electronic Ignition control unit (for the dual ignition).
The total price I paid for all this was Ł850 stg.
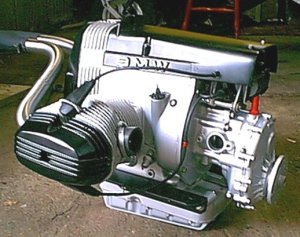
At this stage the engine is still vertualy as fitted to the bike, all we have done is twin plug the heads, for the twin Ignition system, (plus an extra 4-5hp), and had the heads "Gas Flowed" or sometimes called "Polishing the Ports" (which also will add an extra 4-5hp).
Additional work can be done to make the engine lighter, the top cover can be disgarded, and also some of the alloy walls each side of the starter can be removed, I will add details of this later.
Note
None of the above are essential to convert the engine for aircraft use, but for obvious reasons that we use twin ignition systems, and in this case, the added HP both of these mods provide.
Carbs
It is a good idea to completly strip your carbs for inspection and cleaning. It is a simple matter of following your Haynes or similar manual.
reprinted here
A carb rebuild kit is available, and makes sense to use. Also it is recomended to change the float lever valve, as these tend to wear on the bike. We have also changed the main jet to a larger size no.180 to help with the cooling.
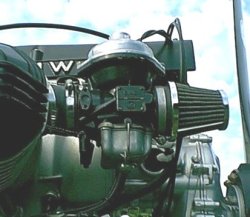
The Carbs are mounted to the heads with a rubber pipe and two hose clips. This is fine, but on the bike they tend to point upwards i.e. not level. This obviously works OK on the bike, but in an aircraft they would be very inclined when climbing out, and could cause fuel problems.
We found an easy solution for this, was by obtaining a Car/lorry type radiator hose the correct diameter, which has a bend in it, and then by cutting a piece out of the bend, at the required angle, you will be able to level the carb out. This might take a few attempts to get it right. (see picture).
Electrics
This is the job a lot of people hate, I have done out a wiring diagram, which shows how it all should be wired up. It is a small pdf file and can be downloaded here (click to open or right click and select save target as) The wiring is similar to that of the bike, apart from adding in the extra coil and electronic ignition control unit (black box) for the dual ignition.
Again what you don't want to do is get to clever here, and change to much, leave all as standard as possible.
What we do is simply split the cable coming from the trigger unit so that it feeds both Electronic Ignition Control units.
How it works is:-
The bike ignition trigger has three wires, these connect into the Ignition Control unit, which then connects to the coil.
What we do is to use the same three wires out of Trigger unit and connect them to a second Ignition Control unit. (a "Y" juction as such).
Using this method we have not made any major modifications which keeps things simple. We don't have a completly dual Ignition system as we still have only one trigger, but it seems to work very well.
Some conversions have added a second trigger on the flywheel for this reason, but it is a little harder to do, also the ignition system can be changed completly for a Micro Digital system sold by the Bike dealers, However we are back to "how far you want to go with the conversion"! I will post details of this when I have it, in the future.
The Black boxes and the coil's have one of the wires joining them (normally green/blue) which is the positive supply (Ignition). We use these wires to control Ignition 1 & 2 On & Off. via a switch on each. (see diagram)
These can be fed direct from the Battery/fuse board or better as shown on the wiring diagram, through a key switch.
NOTES
1. Include a Relay between the starter button and the starter solinoid, to prevent overloading.
2. Use the grades of wire stated, as some carry larger currents than others.
3. The Starter positive (red) cable, and engine ground (black) cables from the battery, should be at least 16mm sq. (we cut up a set of Car Jump Leads)
4. The Master Key switch should be of a suitable rating, as if this fails the engine stops! We replaced the original Xair key switch with a 2 pole 10amp rated one for this reason.
5. The two Ignition Switch's should also be of a good quality, the standard ones fitted to the Xair are ideal.
In the case of the Xair, the original wiring has to be modified as the Ignition switch's are negative and also act as a negative "juction box" for the rest of the dash loom. This will have to be changed as we will now be switching positive.
I will post a suitable wiring diagram for the Xair to BMW soon.
Making up a suitable and reliable reduction system can pose the biggest problem in non standard engine conversions. This has now been all done and figured out for the R100, so you don't need to re invent the wheel.
On the R100 we used the Rotax 'C' type gearbox with an adapter plate and drive to match the two together. The 'C' type box was chosen for the rubber doughnut drive and its availability. Reduction ratio's used vary from 2.62 to 3.47, we have found like others, that the 3.0 to 1 suits us the best.
The casing around where the flywheel is housed, and to which the original bike gearbox bolted to, has a flat surface, and its inner surface is also perfectly round. This allows us to machine a shoulder into a plate of aluminium which will locate and align into the engine casing. This gives us now a excellent place to bolt on our gearbox. (see pic)


The driving connection between the engine and the gearbox consists of the following:-
An aluminium plate of approx 215mm x 6mm is bolted to the engine flywheel. This is to give our spacer/distance piece (middle pic), a flat surface to bolt to. The Rotax rubber doughnut then bolts to this. (see pic on right)
The Gearbox/engine adapter plate (above), then locates to this and bolts in place.


This might seem a bit complicated, but when you have all the drawings and measurements etc, it is very streight forward to machine by anybody who can use a lathe.
Full size drawings can be obtained from us.
The only thing missing from our engine now is a suitable exhaust system, fuel pipes & cables. These again will be tailor made to suit the installation, but when it has been done before, on a Xair, all that has to be done is copy it.
Exhaust
The exhaust pipe is a standard size 38mm and it's a matter of getting some pipes bent up to suit. (we opted for Stainless Steel)
On the Xair we took the two pipes from the exhaust port, bent them up for about 250mm then bent them backwards again, ("S" shape) over the wing to a 'Y' piece which we then added our silencer onto.
(ideal "tuned" length from exhaust port to"Y" is about 750mm). The pictures below show two different installations, the one on the left has much longer pipes leading to the silencer.


Silencers used can vary, we used one from another bike a FZR1000 and it works well. We used a ball/cup joint like the Rotax exhaust, between the "Y" piece and the silencer. (actually we got a standard 582 elbow with the ball on one end, and the cup on the other, and cut it in half !)
Fuel System
Many methods of connecting up the fuel system was tried, and the best method that works well is to install two electric fuel pumps, one of which would be used in normal flight and the other for backup when taking off and landing.
What is also needed is a fuel pressure regulator, which we found works best set at around .2bar (3 psi).
Throttle Cables
These again will have to be made up to suit, and it's a good idea to get some of the original bike ones, as they will have all the ends fitted. The bike cables also use a cable combiner (one in, two out) for both throttle & choke. So all you need is a new cable from your choke & throttle levers to each combiner, fit a brass end and your done!
Conclusion
That is basicly it, depending on how much work you get done to the engine beforehand will determine the work load/time taken to complete the installation.
To date there are seven Xairs flying with the BMW conversion, the majority of them are using the DUC 3 blade propellor which seems to work very well.
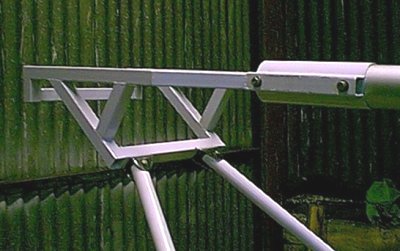
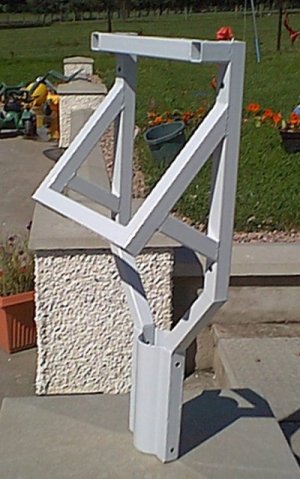
Obviously you will need to construct/modify an engine mount to suit your aircraft. Design of this will depend on aircraft and approving authority.
The pic's below show the mount fitted to the Xair keel and the load testing rig that we used to prove it's strength and compliance to BCAR Section 'S'. This mount is now available for Xair installations.